
Introduction
The buck steps out at 30 yards. Your heart rate spikes. But instead of a clean broadside, he's quartering toward you at a steep angle — and you have maybe five seconds to decide.
Shot placement separates a quick, ethical harvest from a wounded deer that disappears into the timber. Picking the wrong aiming point for the angle presented is what causes most lost deer. A 2008 SEAFWA study found an 18% wounding rate among bowhunters, with less experienced hunters (20 or fewer harvests) hitting nearly 24% — a number that drops sharply with practice and knowledge.
This guide covers everything you need before season:
- Vital zone anatomy and where organs sit relative to external landmarks
- Shot placement for every common angle
- Treestand adjustments that most hunters miss
- The mistakes that wound deer — and how to practice your way out of them
Key Takeaways
- The heart-lung zone — in line with the front leg, one-third up from the belly — is the primary target on a whitetail
- Broadside and quartering-away shots offer the widest margin of error and best odds of a clean, ethical kill
- Frontal, straight-away, and neck/head shots are high-risk and should be passed when possible
- Treestand elevation shifts arrow trajectory — aim lower than you would from the ground
- Pre-season practice from realistic angles and distances is the only way to build reliable shot placement instincts
Whitetail Deer Anatomy: Understanding the Vital Zones
Knowing where to aim starts with knowing what's inside the chest cavity and where those organs sit relative to landmarks you can actually see from your stand.
Heart and Lungs
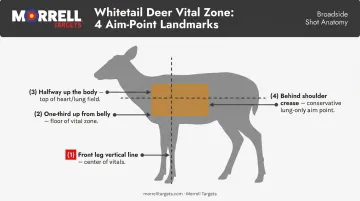
According to the National Deer Association, the ideal broadside aim point sits at the intersection of a vertical line drawn straight up the front leg and a horizontal line halfway up the body. That spot puts your shot at the top of the heart and through both lungs.
The heart sits low in the chest, centered directly in line with the middle of the front leg. Flanking it on both sides, the lungs fill the entire chest cavity: the NDA confirms there is no empty space between a deer's lungs and spine, as the chest operates under vacuum pressure. That makes the lungs a large, forgiving target.
A double-lung hit is the gold standard. Lung-shot deer typically expire within 200 yards as blood rapidly fills the lung tissue, and the resulting blood trail is heavy and easy to follow. That combination of quick kills and clear sign makes the heart-lung zone the primary target for any shot angle.
The Shoulder Bone Question
Once you've identified the heart-lung zone, the next question hunters always raise is whether the shoulder bone blocks that window. It doesn't — not completely. The scapula angles forward and the humerus runs forward (not upward), leaving a clear channel straight up the front leg into the vitals. Thick muscle sits between your arrow or bullet and the heart-lung zone, not impenetrable bone. That distinction changes how confidently you can commit to the aim point.
The Liver: Fatal but Slow
The liver sits tucked between the lungs and the rumen, further back than most hunters realize. It's lethal — but the NDA notes that a liver-hit deer can travel over a mile if pushed too soon. Minimum wait time is 2–3 hours, and many experienced hunters wait 4–6 hours. Aim for the lungs and heart first — a liver hit requires patience, not a quick recovery.
Quick reference: vital zone landmarks
| Landmark | What It Tells You |
|---|---|
| Front leg (vertical line up) | Left-right aim reference — center of vitals |
| One-third up from belly | Floor of the vital zone |
| Halfway up the body | Top of the heart / center of lung field |
| Behind the shoulder crease | Conservative lung-only aim point |
Where to Shoot a Whitetail Deer: Shot Placement by Angle
The vital zone doesn't move — but your entry point on the deer's body does. Every angle requires a different aiming reference on the outside of the deer to hit the same internal target.
Broadside Shot
This is the shot to wait for. The deer stands perpendicular, fully exposing the chest cavity, and you have two reliable aim points:
- In line with the front leg, one-third to halfway up the body — hits the heart directly and clips both lungs; this is Texas Parks and Wildlife's recommended aim point for broadside shots
- Just behind the shoulder — slightly more conservative, avoids bone entirely, and catches the center of both lungs
Both options work, but they suit different setups. The through-the-shoulder approach demands enough draw weight or rifle power to punch through dense muscle and bone. New hunters and lighter archery setups should default to behind the shoulder — it's bone-free and forgiving. Experienced bowhunters with adequate draw weight can aim directly up the leg line.
Quartering-Away Shot
Once you've confirmed the broadside window has closed and the deer is angling away, the chest cavity opens up laterally. Your aim point shifts back accordingly.
The most useful mental cue: aim where you need the arrow to exit — through the offside shoulder. That path threads diagonally through the ribcage, crossing both lungs and often the heart.
Two errors to avoid:
- Too far forward — you'll clip the non-vital front leg and lose the animal
- Too far back — a gut shot means a faint blood trail, a long wait, and a real chance of losing the deer entirely
For bowhunters, an exit wound isn't a bonus — it's the difference between a clear blood trail and a frustrating grid-search, especially in low-light conditions.
Quartering-Toward Shot
Bowhunter-ed identifies this as a poor shot opportunity because the near-side shoulder partially blocks the vitals. Lighter archery setups should pass and wait for a better angle.
If you must take it:
- Aim at the center of the near shoulder
- Visualize the shot exiting at the middle or rear of the opposite ribcage
- Maintain the same height reference — between halfway and one-third up the body
Rifle hunters: the near-side shoulder absorbs significant damage on this angle. Factor that into your meat recovery expectations.
Frontal Shot
A deer facing you head-on presents the narrowest profile and the most bone. The sternum blocks all low aiming points. Bowhunter-ed classifies frontal shots as very poor shot selections for this reason.
If no other option exists: aim high and center, targeting the base of the neck where it meets the chest. This accesses the aorta and the front of the heart-lung area. Never aim low or to one side — you'll hit sternum or gut, not vitals.
Shot Angles and Situations to Avoid
Some shots aren't worth taking. Pass them. A better angle almost always follows with patience.
Head and neck shots — Hunter-ed notes that while a well-placed neck or head shot can be lethal, ethical hunters avoid them. The target is tiny, head movement is unpredictable, and a marginally off hit to the jaw causes a slow, non-retrievable injury with no recovery path.
Straight-away (rear-end) shots — Bowhunter-ed is clear: don't take this shot. Ham muscle and hip bone shield every vital organ from a direct rear approach. Even a powerful rifle risks ruining meat without cleanly reaching the heart-lung zone. Wait.
Moving or running deer — A deer's body rotates mid-stride, making the entry point unpredictable. The shot that looked like a perfect broadside as you released may land in the gut as the deer turns. Bowhunter-ed teaches waiting for the correct moment — and in practice, even a two-second pause often produces a stationary shot opportunity.
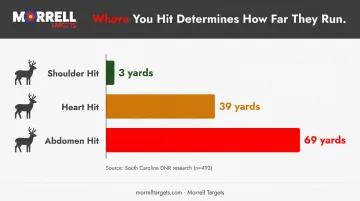
The consequences of a bad angle show up clearly in the data. South Carolina DNR research on 493 harvested whitetails found that shoulder-hit deer averaged 3 yards of travel after the shot, heart-hit deer averaged 39 yards, and abdomen-hit deer averaged 69 yards. Shot placement determines whether you're tracking a deer for 40 yards or spending hours searching for one you'll never find.
Treestand Shot Placement: How Elevation Changes Your Aim
Treestand bowhunting introduces two problems that flat-ground practice doesn't prepare you for.
The Trajectory Problem
From elevation, your arrow travels on a steep downward angle. At extreme heights, the spine and backbone begin to shield the vitals from above. Bowhunter Magazine warns that straight-down shots frequently produce single-lung hits or poor blood trails — the path through the chest cavity is compromised when you're shooting nearly vertically.
The fix: aim lower on the deer's body than you would from the ground. Visualize the exit point, not just the entry point. Where does your arrow need to come out? If the answer is "the lower chest wall on the far side," you're thinking correctly.
The Distance Problem
Your rangefinder gives you line-of-sight distance — but that's longer than the actual horizontal shooting distance. Bowhunter-ed's example is instructive: at a 5-yard stand height with a 13-yard diagonal to the deer, the true horizontal shooting distance is 12 yards. That 1-yard gap is enough to push your arrow from the lungs to the spine at typical archery distances inside 40 yards — use an angle-compensating rangefinder to avoid it.
Practice From Height
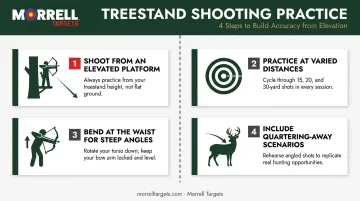
The NDA recommends that bowhunters practice from an elevated position at varied distances and angles before season. MeatEater adds that steep angles reduce margin for error and that bending at the waist (rather than dropping your bow arm) is the correct form adjustment for treestand shots.
Before season, build that repetition into your routine:
- Shoot from a treestand or elevated platform, not just flat ground
- Practice at varied distances (15, 20, 30 yards) and multiple angles
- Bend at the waist for steep downward shots — don't drop your bow arm
- Include quartering-away scenarios, where angle errors cost you the most
Common Shot Placement Mistakes — and How to Practice Your Way Out
Shooting Too High
The most common treestand bowhunting error. Steep downward angles push arrows higher than the aiming point. Fix: aim at the lower one-third of the chest, not the middle, when shooting from elevation. Practice from realistic angles before season.
Shooting Too Far Back
This often happens when a deer is quartering toward the hunter but the hunter hasn't confirmed the angle change. A deer that grunts or flinches often pivots slightly — if you've already committed to a "behind the shoulder" aim point and the deer has rotated 15 degrees toward you, that entry point now paths toward the liver or gut.
Confirm the angle before releasing. Don't assume.
Not Waiting for the Right Angle
Patience is the most underrated skill in deer hunting. A quartering-toward or straight-on deer will almost always shift to a better angle if you hold. A passed shot costs you nothing. A poor shot can cost you the deer and weeks of recovered confidence.
Close the Gap With Realistic Practice
Knowing the mistakes is only half the work — avoiding them under pressure takes repetition on anatomically accurate targets from realistic positions. These Morrell options are built specifically for that kind of drilling:
- Bionic Buck III 3D Target — properly scaled deer profile to practice exact entry points, not just a bullseye circle
- NASP-IBO Life Size Whitetail Archery Target Face — life-size whitetail outline for dialing in broadside and quartering angles
- Yellow Jacket MOD Pro Buck + Turkey Wrap — swappable deer vital zone face for an existing target, so you can work multiple shot angles without a new setup
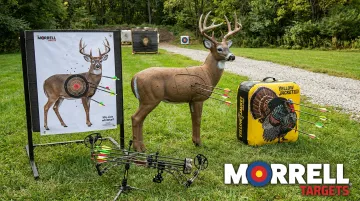
The critical detail: practice from your actual treestand height, not just the ground. Set up your target at your stand angle. Shoot quartering-away from 20 feet, broadside from 25 yards. Those reps are what make the right call instinctive when a real deer steps into range.
Frequently Asked Questions
What is the target area for whitetail deer hunting?
The primary target is the heart-lung zone — located just behind or in line with the front leg, one-third up from the belly line. This region contains the largest concentration of vital organs and provides the greatest margin for a clean, ethical kill even if the aim point is slightly off.
What is the best angle to shoot a whitetail deer?
Broadside is universally the best angle. It fully exposes the chest cavity, gives you clear access to both lungs and the heart, and offers the widest margin of error if your aim point drifts slightly forward or back.
How far will a deer run after being shot in the lungs?
A double-lung hit typically causes deer to expire within 200 yards - that is the outer bound you should plan around. In practice the average is much shorter: South Carolina DNR data puts the typical travel distance at about 39 yards, well within that 200-yard ceiling. A single-lung hit can push the distance significantly beyond that average, making shot confirmation critical before you track.
Should you shoot behind the shoulder or through it on a broadside deer?
Both approaches work. Aiming in line with the front leg targets the heart and front of the lungs directly but requires enough power to push through dense muscle and bone. Aiming just behind the shoulder hits the center of both lungs with no bone in the way, making it the more forgiving option for most hunters.