Building one looks straightforward on paper. In practice, results vary a lot depending on the material you choose, your bow's draw weight, and how solidly you put the frame together. A backstop thrown together with mismatched scraps can fail on the first heavy shot.
This guide walks through the exact steps to build a reliable backstop, what to gather beforehand, the factors that actually determine performance, and the mistakes that cause most DIY builds to fail.
Key Takeaways
- A backstop is a shock-absorbing barrier, like stall mats, foam, or hay, that catches missed or pass-through arrows.
- Size the backstop larger than your target face, and match material density to your bow's draw weight.
- DIY builds typically run $50-$150 in materials, but demand tools, time, and testing before use.
- Commercial targets skip the construction entirely with built-in stopping power.
- Positioning, bracing, and routine maintenance matter just as much as the initial build.
How to Build an Archery Backstop: Step-by-Step
Step 1: Choose and Test Your Backstop Material
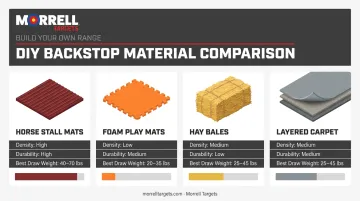
Your material choice determines whether arrows stop cleanly or punch straight through. Common options include:
- Horse stall mats - dense rubber, widely available at farm supply stores, and a favorite for their affordability and density
- Foam play mats - lighter and easier to cut, better suited to lower draw weights
- Hay bales - cheap and simple, but they break down fast and lose stopping power over time
- Layered carpet - a budget filler material, usually stacked several layers deep
Before you build anything, shoot a few test arrows into a sample of your chosen material. Skipping this step is risky: a mat that stops a 40 lb bow might let a 60 lb bow's arrow sail straight through, and you won't know until it's too late.
Step 2: Measure Your Space and Plan Dimensions
Build your backstop wider and taller than the target face, not the same size. Off-center shots need somewhere to go besides open air.
- Add at least 12-18 inches of buffer on each side and above the target
- Check what's directly behind your shooting lane: a solid wall, a fence line, or genuinely open space with no pathways or neighboring yards
- Treat the backstop as a second line of defense, not a guarantee
NFAA range guidance recommends clearing 25 yards or half the shooting distance, whichever is greater, behind an unbackstopped target. This benchmark shows how much buffer space matters, even with a backstop in place.
Step 3: Cut and Assemble the Frame
Build a rectangular frame from 2x4s sized to fit your mat, then add diagonal braces (commonly cut at 45 degrees) at the corners to keep the frame from racking under impact.
Use pressure-treated lumber, especially for anything staying outdoors. Treated pine resists rot, fungal decay, and insect damage far better than standard lumber left exposed to rain and sun.
Step 4: Attach the Backstop Material and Add Support Feet
Screw the mat directly to the frame using fender washers under each screw head. The wider surface area spreads the load and keeps repeated arrow strikes from tearing the material loose over time.
Then build feet:
- Cut wide base supports, longer than the frame is deep
- Brace each foot with an angled support piece
- Attach feet to the bottom of the frame with lag bolts, not just screws
- Test the stand by pushing on it from the front, it shouldn't rock or lean
Undersized feet are one of the most common reasons DIY stands tip forward after just a few sessions.
Step 5: Position, Secure, and Test Before Regular Use
Set your target in front of the finished backstop, centered with equal buffer on all sides. Take your first shots at a reduced draw weight to confirm the material stops arrows before you shoot at full power.
When pulling arrows out, use an arrow puller instead of yanking by hand. A puller gives you a firmer grip and reduces the strain that can crack or splinter a shaft during removal, though you should still inspect every arrow for damage before shooting it again.
What You Need Before Building Your Backstop
Gathering materials and confirming your site conditions upfront saves you from rebuilding halfway through, or worse, discovering a safety problem after the fact.
Materials and Tools Checklist
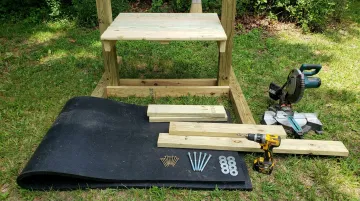
- Stall mat or equivalent, 4x6 ft minimum
- Pressure-treated 2x4s or 4x4s for the frame
- Deck screws, lag bolts, and fender washers
- Miter saw for angled cuts
- Drill/driver
- Tape measure and speed square for accurate cuts
Retail listings for a 4x6 ft, 3/4-inch stall mat run roughly $40-$110 depending on the retailer, with treated 2x4s adding another $20-$40 to the total.
That puts most simple builds in the $50-$150 range, but prices shift by region, so check current pricing at your local farm supply or hardware store before budgeting. Some farm supply stores also carry used or overstock mats, which can lower the total further.
Site and Safety Readiness
Confirm your backstop zone is clear of foot traffic, driveways, and shared property lines. Behind the setup, you need either a solid wall or fence, or enough open distance to absorb a stray shot that clears the backstop entirely.
If your range sits near a driveway, sidewalk, or anywhere children might wander, add perimeter fencing or visible signage. It's a small addition that prevents a serious accident.
Key Factors That Affect Backstop Performance
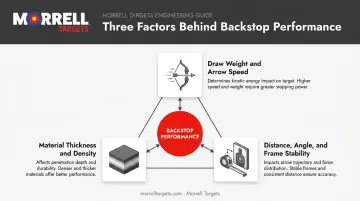
Material alone doesn't determine whether a backstop holds up. Draw weight, distance, and how the frame is built all interact to decide whether arrows stop cleanly or blow through.
Draw Weight and Arrow Speed
Heavier draw weights generate more kinetic energy, but draw weight alone doesn't tell the full story. standard kinetic-energy calculations factor in both arrow mass and measured speed in feet per second. A heavier, slower arrow can carry different penetration potential than a lighter, faster one at the same draw weight.
Practical takeaway: don't assume a single mat thickness works for every bow. Test your actual setup, and if arrows are punching through, add a layer or switch to a denser mat.
Material Thickness and Density
- Single-layer foam mats handle lighter recurve and youth bows well
- Multi-layer stall mats or compressed foam suit compound bows and heavier draws
- Thicker material means harder arrow retrieval and more wear on the mat over time
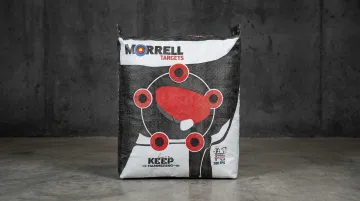
Commercial-grade targets apply this same principle. Morrell's patented MLDD (Multi-Layered Density Design) bag targets layer denser foam toward the center, stopping faster arrows while keeping outer layers soft for easy removal.
Distance, Angle, and Frame Stability
Shooting from closer range means arrows hit with more retained velocity, so closer setups need thicker stopping material. Elevated or angled shots also increase the odds of missing the backstop's catch zone entirely, which is exactly why extra height and width buffer matters so much in Step 2.
Frame stability matters just as much as positioning. A frame that shifts after every few shots throws off your aim reference over time, and eventually tips. Wide, well-braced feet distribute impact force across a larger footprint, extending both the stand's stability and its usable life.
Common Mistakes and Troubleshooting Tips
Most backstop failures trace back to a handful of avoidable errors made during planning or construction.
Common Mistakes to Avoid
- Building the backstop the same size as the target, instead of noticeably larger, leaving off-center shots with nowhere to land
- Skipping the material test before full setup, then discovering arrows punch through on the very first session
- Using undersized or unbraced feet that tip forward under repeated impact
Even a well-built backstop can run into trouble once shooting starts. Here's how to spot and fix the most common problems:
Troubleshooting Common Problems
| Problem | Likely fix |
|---|---|
| Arrows passing through | Add a second material layer or switch to a denser stall mat |
| Backstop leaning or shifting | Reinforce feet with extra bracing, or anchor the base with weighted supports |
| Arrows splintering on impact | Check material density against your draw weight, or increase shooting distance to soften impact |
When to Build vs Buy: Alternatives to a DIY Backstop
A DIY backstop works well for casual, lower-draw-weight home shooting. It starts to fall short for heavier compound bows, crossbows, frequent daily use, or any school or commercial range setting where consistency and safety compliance matter.
Hay bales are the cheapest entry point, but they compress and rot within a season or two, forcing constant replacement. Commercial-grade targets take a different approach entirely.
Morrell® Targets, for example, builds its NASP Eternity School Target specifically for institutional use. Rated for bows 50 lbs and under, it's constructed with an Internal Frame System and 220 layers of material to handle an entire archery class shooting repeatedly through a school day. That's engineered durability that's genuinely hard to replicate with lumber and a stall mat in a weekend.
For home archers who'd rather skip construction altogether, Morrell's High Roller Foam targets and bag targets use a similar layered design philosophy. Foam and internal framing catch arrows and release them easily, without needing a separate backstop behind the target.
Why schools and ranges tend to prefer purpose-built targets over DIY:
- Compliance: NASP-rated equipment meets specific draw weight and arrow-type standards a homemade stand can't certify
- Volume durability: Layered construction handles dozens of shooters daily without degrading
- Lower long-term cost: Replacement covers (around $31.99) extend a target's life instead of a full rebuild, unlike a worn-out DIY mat that just gets replaced
Frequently Asked Questions
What should I use as a backstop for an archery target?
Stall mats, foam play mats, hay bales, and layered carpet are all common choices. Match the material's density to your bow's draw weight; heavier bows need denser or multi-layered material.
Can I leave my archery target outside?
Prolonged outdoor exposure, especially UV, can weaken foam and degrade stitching over time. Cover or store your target when it's not in use to extend its lifespan.
How thick should an archery backstop be?
Thickness depends on your draw weight and the material's density; there's no single universal number. Test with real arrows at reduced draw weight before committing to regular use.
Can a backstop stop arrows from a 70 lb draw weight bow?
Heavier draw weights need denser or multi-layered material to prevent pass-through. Always test at a reduced draw weight first to confirm your setup can handle full power safely.
How much does it cost to build a DIY archery backstop?
Most simple builds land in the $50-$150 range for mat and lumber, though local pricing on stall mats and treated wood varies. Check current prices at your nearest farm supply or hardware store before budgeting.
Do I need a backstop if I already have a target?
Yes. A target alone doesn't catch missed shots or clean pass-throughs; only a backstop behind it adds that safety margin for stray arrows.